
Less is more
- Mesh&Craft
- Jun 22, 2018
- 9 min read
Polygonal paper art is based on meshes, but…what is a mesh?

A mesh is a collection of vertices, edges and faces that defines the shape of a polyhedral object in 3D computer graphics and solid modeling. The faces usually consist of triangles (triangle mesh), quadrilaterals, or other simple polygons.

Working with 3d modelling software, you can increase or decrease the quantity of meshes obtaining a more or less detailed object.

but, I believe in the theory that
LESS IS MORE
So, an object represented with less meshes can be something with an aesthetic value for your home.
Result is that 3d sculptures represent an innovative and creative way to decorate your house.
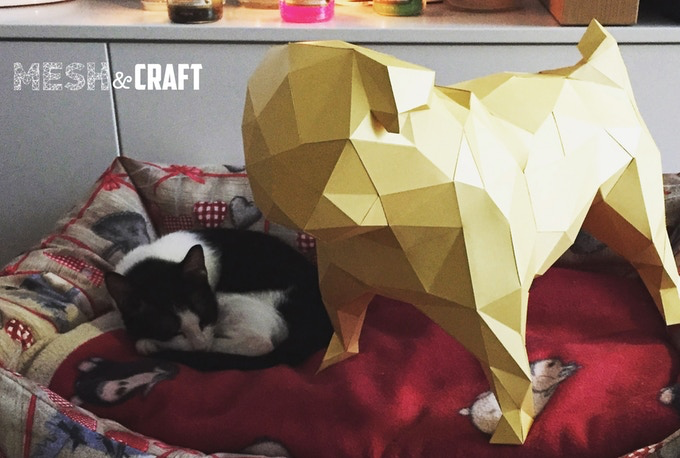
...always the same pug while guarding my cat Artù!
Using fine papers, low poly sculptures can represent a furniture element for your wall.
The sculpture can be a paper art element for your wall

👉 but now, let me ask you to...Like and Share our Facebook page
How a sculpture is crafted
In general the process to develop a low poly sculpture is:
Subject 3d modelling design
Mesh optimization
3D unfolding
Cutting (here is where you are proud to have a Cameo!)
Folding
Assembling
Step 1 and 2 are based on very specific 3d design skills (I can give you links of tutorials on CAD softwares but it mostly depends on the software you decide to focus on).
Step 3 is also based on specific softwares that unfold 3d models in 2d models adding fold lines and creating references that you need to assemble the sculpture.
Step 4 thank you Cameo for existing! By the way I’ll give you details on how to use DXF files resulting from the activity of the previous step. Of course, having the DXF file of the sculpture makes you skip all the previous steps. So if you want to start practicing with 3d paper sculptures feel free to ask me the price of the model you like or to ask me to produce for you a brand new 3d model and DXF file.
Step 5 is a step that can be completely manual or supported by the cameo.My suggestion is to start manually and then try to use your Cameo. I’ll show you both approaches.
Step 6 you have to do it manually but I think that is the most relaxing and satisfying step of the entire process. Here you can see your creature growing step by step, piece by piece.
💥 Ok let’s start!
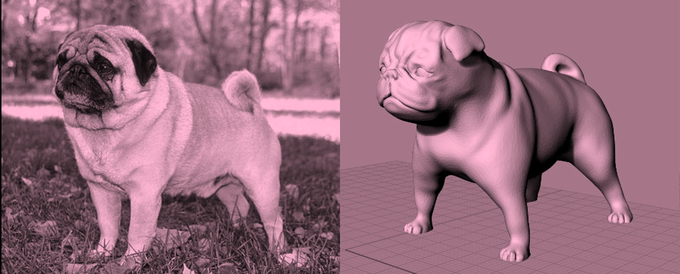
1.Subject 3d modelling design
Subject design: I usually start working on 3D models but sometimes I can start from a real model to replicate into the virtual space. In order to work on a 3D model you should have specific design skills with CAD software.
I personally use Blender or Rhinoceros for the 3d modelling but there are tons of CAD softwares!
If you are interested I can give you links to professional tutorials. Consider that there are tons of tutorials, books and courses on CAD software.
I was lucky because I’m an engineer so I did my thesis work on CAD softwares but I understand that is something not so easy.
👉 Feel free to contact me if you want details
2.Mesh optimization
Mesh design: this is a specific step where you work on the dimension and quantity of the meshes trying to reach the right tradefoff in terms of feasibility and design.
The more meshes you have and the more paper you need and the more hours you need to assemble a sculpture.
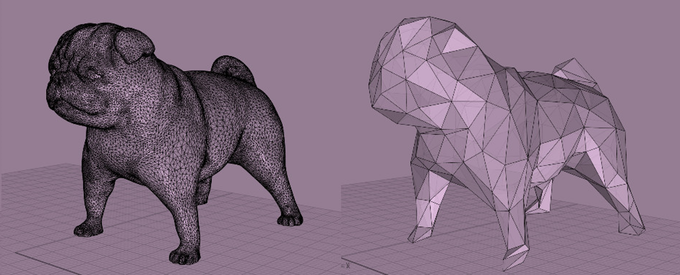
Usually you can work on the meshes in the same CAD software that you used to develop the 3D model but there are also specific software essentially focused on the optimiziation of the meshes.
To give you a short list:
Meshmagic
Meshlab
Meshmixer
Sculpteo
Zbrush
Mudbox
Blender
Sculptris
👉 Remember, feel free to contact me if you want details and also...
3. 3D unfolding
This is the magic step where 3d turns to 2d.
Have you ever tried to make a paper cube?
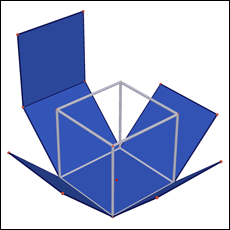
The software you are going to use in this step (yessss another software!!!) unwraps and flattens the cube creating also flaps for glue, fold lines and references for the assembly step.

So the software unwraps and flattens a 3d model into a planar figure you can print on paper:

So, your pug will result in something like this (no animals were threatened during this tutorial!!!)

Even for 3d unfolding softwares you have many solutions.
Here is a small list of commercial softwares:
Autocad inventor
Pepakura designer
Solidworks
Laminadesign
Touchcad
Sketchup (unwrap addon)
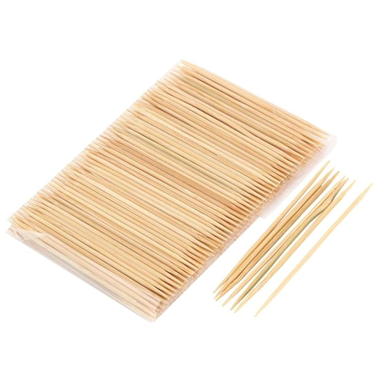
4. Cutting (here is where you are proud to have a Cameo!)
Craftmanship means many hours spent cutting, folding and gluing paper polygons in order to reach the final result.
we are lucky!

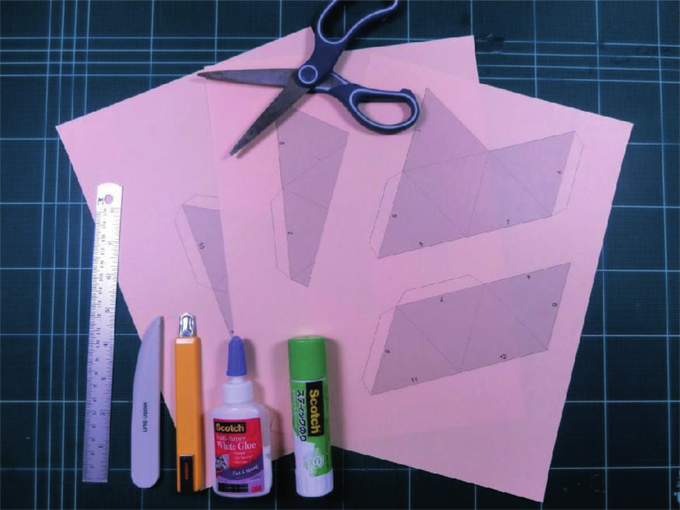
so let’s skip the cutting equipment and jump to the most important resource you need that is PAPER.
If you want to know all the equipment needed for the manual crafting process feel free to contact me.
Let me give you some details on the paper that you will use with your cameo
Remember!!!
You will need a HARD, HEAVY, SOLID, THICK paper !
What you need is CARDSTOCK!
Card stock = paper with weights from 50 lb to 110 lb (about 135 to 300 g/m²).
I use 200 g/m² paper and I find it best combination to print on and work within smaller details.
Being italian i usually refer to GSM is an acronym standing for ‘Grams per Square Meter’. The higher the GSM number, the heavier the paper. If you’re buying print then make sure you know what you’re talking about. Being specific about the GSM you’re after can make all the difference and you’re likely to be taken more seriously by a printer if you ask for a specific GSM rather than just asking for thick or thin paper.
Although any GSM is available, you’ll most commonly find: 90gsm, 100gsm, 120gsm, 140gsm, 210gsm, 250gsm, 300gsm, 350gsm and 400gsm.
210gsm and above is the best for paper sculptures.
Size / format of paper:
standard for EUROPE = A4 ... 210 × 297 mm
standard for USA = Letter ... 215.9 mm × 279.4 mm (8.5 × 11 inches)
Now let me give you more details on DXF files.

If you have a DXF file you have what you usualyy call “template” and so you can skip all the design steps, softwares etc..etc..
The native file format for Silhouette Studio is .studio. It cannot import .svg unless you have upgraded and bought the Designer Edition.
If you do not wish to pay for the upgrade, you can use .dxf files.
The disadvantage to .dxf files is that they do not come in layered like a .svg file but at the end is not so difficult to manage.
For the 3d paper sculptures there is no problem because you only have one layer.
You can choose to open a .dxf file by clicking "Open" and changing Files of type filed to "All Files" or "DXF". Navigate to the folder where your LD .dxf files are stored, choose a file and click "open".

Consider that every sculpture requires more than one paper sheet to be unfolded and that you will have a .dxf file for each paper sheet.
So, you can import all your .dxf files one at a time or all at once into your Silhouette Studio Library. When you import your files into the Library, you will have thumbnails of the images for easy viewing. You also have the ability to make sub directories for easy organization of files or to type in notes about images.
To import one file at a time to your Silhouette Studio Library, click Import > Import to Library.Navigate to the folder where your LD .dxf files are stored, choose a file and click "OK".
To import many files at one time into your Silhouette Studio Library do the following:
Open your Library in Silhouette Studio
In another window, open the folder that your LD .dxf files are stored. Make sure you can see both the Silhouette Studio Library and the open folder with the .dxf files.>
In the .dxf folder, select multiple files at once by holding down Shift.
When you import a DXF file you also have to make a few setup step in your Silhouette Studio.
In order to use a template with your Cameo you will need 2 files:
Pdf file
Dxf file
….in case you buy the template from me I will provide you also a pdf with instructions and walkthrough for the assembly step ;)
You need to print the PDF one in order to have references for the next step (edge id#, folding lines) once that all the pages are printed and ready you can put each page on the mat and load the related DXF file.
This is an overview of the procedure to follow for each page:

👉 Don't remember if I already told you... 😂
The preferences to setup are:

Then you can open the dxf file

Set the page size (my templates use A4 paper format):

Set registration marks to 10 mm
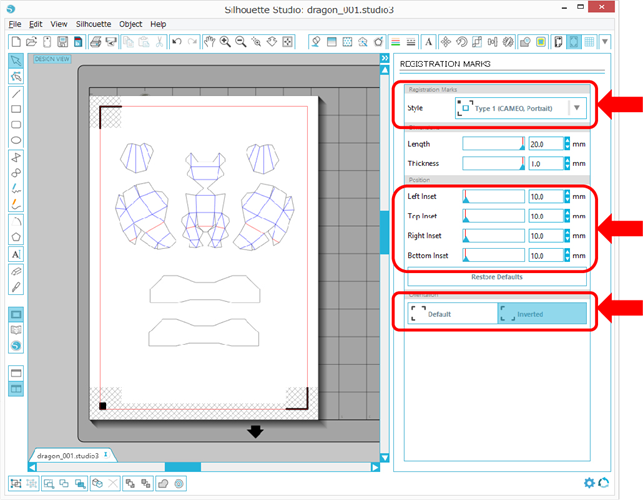
Once you complete the setup process, you can place the printed page on the mat as showed in Silhouette Studio.
Now consider that you will have different types of lines:
Cutting lines
Folding lines
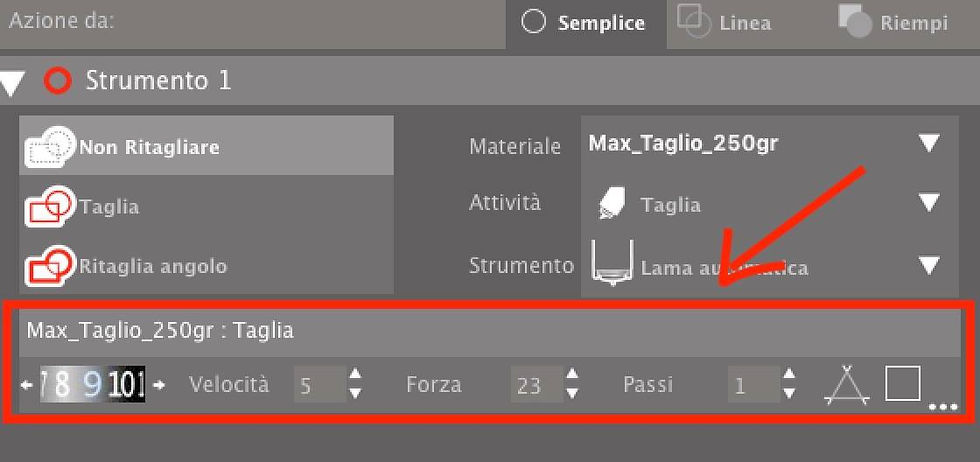
Based on the paper you use and on the GSM (grams per square meter) you will have to setup your Cameo cutting options.

For a 250g/m2 paper I usually setup the Cameo as follows:
For the folding lines there are 2 possible approaches:
a) Skip the folding lines
b) Cameo trace of the folding lines with a light cut
In both cases consider that you will have to fold paper manually even if in the second approach you will take advantage of the light cut while folding the paper.
In case you want to try the “b” approach you may need the setup option for the folding lines:

Completed all the setup process you can start to cut with your cameo.
5. Folding
You saved many hours thanks to your Cameo but you have to assemble your sculpture
I already mentioned mountain and valley folds so let me explain what they are.
There are two types of folds you can do when making paper models

MOUNTAIN
· imagine a letter ... A ... you can "touch the top" edge of the paper
· basically fold the paper on its edge: DOWN
· "dash dash dash"
· _ _ _ _ _
VALLEY
· imagine a letter ... V ... in where you can "put your finger inside" the shape
· basically fold the paper on its edge: UP
· "dash DOT dash DOT dash"
· _ . _ . _ . _
SOLID LINE
· this is the line where you cut your shape out !
· -----------
6. Assembling
The final step, the most relaxing, the most satisfying! I’m going to show you pictures taken from my Italian tutorial. If you want I can send you for free the pdf file of the Panda Bear.
Now you need glue!!!!
LIQUID PAPER GLUE
GOOD: if you use a small bit!
no smell
dries quick (3 to 5 mins)
easy to use and is more precise
BAD: if you use a lot of it!
hardens in 60 mins
dries slower (5 to 15 mins)
can soak your paper and distort it
cannot redo mistake, once dried, it is glued forever
HOT GLUE GUN
GOOD:
hardens in 30 mins
cools down + dries quick (2 mins)
you can heat it and "move" your glued parts a bit if you made a mistake
BAD:
less accurate
needs electricity
burns your fingers if not careful
smells a lot (makes you sick, headaches)
SOLID GLUE STICK
please avoid it!!!
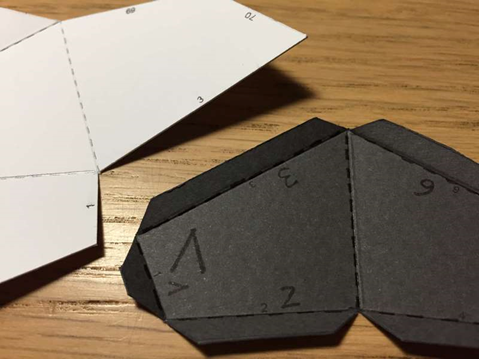
Now, let’s talk about edge id #.
I already mentioned that every edge of the sculpture is identified with a number (here is an example of parts taken from my italian tutorial):
Once that every fold line was folded...
The simple rule you have to follow in order to assemble the sculpture is that you have to couple edges with the same ID#
To do this, the tool you are going to use is:
Put a small amount of glue on a piece of paper

distribute the glue on the flap number 3 (for example) using the tooth stick and don’t soak the paper...

Now couple the two edges numbered #3 like in the following picture:

Place the 2 pieces in order to have a perfect overlap of the the flap with the edge of the other piece and then press for 10-15 seconds:

Now repeat this procedure for all the pieces of the sculpture.
The final result will be ✌️:
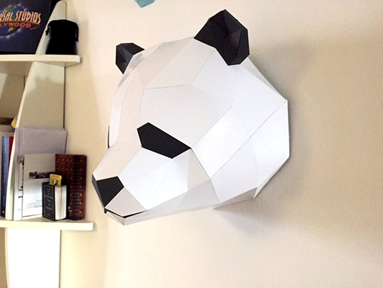
Here is a PDF of the Panda that you can print an practice on
👉👉👉 Click on the panda gif to download it!
Conclusion
How you assemble the parts but also the sequence that you follow can influence the final quality of the sculpture.
For example, starting from the ears of the Panda bear is not the same that starting from the nose!
That’s why, together with the PDF and DXF files I will provide a parts layout showing the location of each piece in the sculpture.
Now you know almost everything about 3d sculptures.
Consider that the design step (step from 1 to 3 can last weeks) that’s why prices of the templates may vary from sculpture to sculpture.
You can see all the models that I created on my Instagram account but I also have hundreds of other subjects.
So if you don’t find the subject you are looking for, feel free to contact me m.me/meshcrafter
The DIY kit that for each sculpture consists of:
pdf template, dxf files, svg file, jpg files
general instructions (mainly the final part of this tutorial)
parts layout showing for each page the corresponing 3D part into the sculpture

👉 Thank you for your patience and remember...


Comments